ShopDreamUp AI ArtDreamUp
Deviation Actions
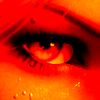
The specular light map help to create highlights on models. It is a black and white image, where white parts will receive a stronger illumination from light sources. For eyes, whose material is like that of porcelain, a light source's reflection should appear as a strong white spot. These bright spots are called catch lights. The eyes catch the light so to speak. It is what brings life to eyes and make them sparkle. As you might have noticed, eyes may catch several bright spots, coming either from multiple light sources, or from one light source that is reflected into the eyes from multiple sources.
The typical specular light map for the eyes of doa models look like this:

Examples of uneven catch lights.


The solution
Unfortunately I don't know how to test the first solution, but here is an example of a symmetrical specular light map.

The typical specular light map for the eyes of doa models look like this:
- There are several white spots in it. When one light source hits the eye it will brighten a couple of those spots. Artificially, it mimics the effect of several light sources hitting the eye.
- The same specular light map is used for both left and right eye. Unfortunately, it appears to be mirrored horizontally for one of the eyes. This is bad, because when the white spots appear at mirrored locations, the left and right eyes will receive different and uneven catch lights.
Examples of uneven catch lights.
The solution
- Make sure the specular light map is textured on both eyes with no mirroring going on.
- Or make the specular light map perfectly symmetrical. Mirroring have no effect on a symmetrical image.
Venus Scripts 4.3
About This is a collection of blender python scripts for Doa VV models. Included in the download: - Venus Rig - Venus Organizer Both has instructions (bottom of script) on how to execute them, so I won't cover that here. The rig script converts the default rig to a user friendly ik rig. The organizer script sort meshes into collections, renames them, and add materials. My intention is that you run both scripts to prepare a model for rendering. Supported Models DOA VV models - as ported by shuubaru. DOA5 - standard xps bone layout (e.g. xps-fanatic) Supported Blender Versions Blender 4.0 Version History Version 1.0 First Release. Version 2.0 (2021-12-26) - Added IK for arms and legs - Added Eye Tracking with automatic eyelid movement - Added Head Tracking - Added Bone Shapes and Bone groups - Reorganized bone layers - Added more bone names for better support of different models. Version 3.0 (2023-11-20) - Updated to work with blender 4 (not backwards compatible with blender 3) -
DOA Eye Shaders
The Simple Setup Here we have a simple setup. A diffuse texture and low roughness. It may be what beginners choose for their first renders. The problem with this setup is that the reflections we get (white dots) appear in the wrong place. In isolation the eyes look fine, but when the face cover part of the eyes, it tends to cover the white dots. Many render artists wrestle with the white dot problem and have strange workarounds. We are not interested in those work arounds. Let us continue with more setups. The Fake Setup The fake setup as I call it, is the traditional setup, as seen in the DOA5 games. It utilizes the specular texture. However, there are a few things to know about this setup. It is not as simple as connecting the specular texture to the specular slot. The image below illustrate the problem. Reflections in one eye only! Why does this happen? First we need to deal with mirrored UV. As seen in the image below, the white dots in the specular texture appear in
2020
2020 has been a pretty crappy year. COVID, bad economy, people act crazy etc, censorship on the internet. The dull world has an effect on my creativity. I produce less. But...I try to see my lower activity as some vacation. You know, until some months ago, I had released a pic every week for 4 years. It strains your energy to dedicate yourself to a hobby like that and work at a job. Having two jobs is what it is like.
But I haven’t stopped rendering. No no. It’s just that I don’t push myself to release. I still educate myself, pose new projects and play around in blender. I think I have 4 WIP blender scenes, and 10 posed
DOA Skin Shader
This is an overview of my body material. It has three groups: Tanner - Darkens the albedo texture. Skin Pores - add detail normals (such as skin pores) to the normal map. Skin Shader - contains a principled shader with specific settings. A group can be included in many materials, but it is global. If you tab into a group and edit what is inside, every material that utilize the group is effected. This become useful when making renders of several characters, as it is inefficient to alter a setting in several body/face materials, compared to edit the setting once inside a group. More reading on groups: https://docs.blender.org/manual/en/latest/editors/texture_node/types/groups.html The tanner group: The tanner contains color edit nodes to manipulate the skin hue. I find a little increase in gamma can help skin from being too pale. A multiply node with black or dark brown can also be helpful to dull down the skin if it appears too bright in a render. Skin Pores This group adds
© 2016 - 2024 RadiantEld
Comments6
Join the community to add your comment. Already a deviant? Log In
I can't seem to find the specular light. Where can I find it?